Installing Ghost on Ubuntu 14.04

When I'm working with a new app or new technology I like to jump in at the deep end because I want to understand what's going on under the hood when using third party services or doing things the quick way. I also found the Ghost setup/installation docs to be spread out across multiple sites and various different guides so I thought it might be useful to others to document my process.
So, with that out of the way, here is my journey through setting up Ghost the hard way from start to finish...
Development setup
Pre-requisites
There is only one major pre-requisite for Ghost and that is Node.js. Ghost runs on javascript/node rather than ruby/rails, php or some other framework so let's get that installed.
I use Homebrew as it's a really simple and easy package manager for OS X (Installation instructions can be found at http://brew.sh). To prove how simple it is, there is only one command needed to install node:
brew update && brew install node
This updates homebrew and installs the latest Node.js version (v0.10.35 at the time of writing).
Getting the code
I want to set Ghost up in a git repository so that I can keep track of changes, as well as offering an easy rollback facility if I ever need it such as a Ghost upgrade gone wrong or a malfunctioning add-on.
First, download Ghost and extract it into your own blog folder (replace 'my-blog' with your blog name):
wget https://ghost.org/zip/ghost-latest.zip
unzip -d my-blog ghost-latest.zip
rm ghost-latest.zip
cd my-blog
Next, let's make this a git repository and commit the core files:
git init .
git add .
git commit -m "Initial commit"
As I will be running Ghost locally for development and testing I want to avoid including any of the generated files and content in my git repo. It turns out that the core devs don't want to do that either so lets pull in the .gitignore file from Ghost's main repository:
wget https://raw.github.com/TryGhost/Ghost/master/.gitignore
Now, as this file is designed for core development there are a couple of lines that need to be removed for our theme and addon changes to be tracked. Find these two lines in .gitignore and delete them:
/content/apps/**/*
/content/themes/**/*
Then commit the .gitignore file:
git add .gitignore
git commit -m "Ignore everything that shouldn't be uploaded to the server"
That's it for the basic code retrieval, we're now set up with a git repository where we can make theme, addon or core changes and test them locally before deploying to the live site.
It's worth noting that it's possible to work without git by downloading the core files directly on the server and then changing the app/theme files as you see fit. This is something that most other tutorials suggest, however I like the control and history tracking that git offers so this is the route I took.
The final step is to create a repository on GitHub and push the code to it (replacing the repository name with your own details):
git remote add origin git@github.com:my-account/my-blog.git
git push -u origin master
Having a hosted copy of the repository makes it simple to pull down the latest version of the blog directly on the live server.
Local setup and testing
Getting the local copy up and running is very easy, just run the following commands:
npm install -g grunt-cli
npm install
npm start
Wait until you see Ghost is running ... in the output then visit http://localhost:2368 to make sure it's not lieing to you.
Next, visit http://localhost:2368/ghost to configure the basic blog details and to create your local user.
That's it! The local copy is now up and running, ready for theme or add-on development. To stop the ghost server use Ctrl-C in the terminal to cause a shutdown, and to start it back up at any time run npm start.
Going Live
I wanted to set everything up manually in order to learn the installation process and document the moving parts rather than using the one-click scripts. Here is the process I went through...
Server provisioning
I decided to go with Linode for the VPS provider. Linode doesn't have the $5/mo option that DigitalOcean does but I have found it to have more consistent performance and I have had good experience with their support team.
After creating a Linode 1024 instance, I used their control panel to rebuild with a Ubuntu 14.04 64bit image. Once the VPS is rebuilt, click the "Boot" button to get it up and running.
Next, follow these guides to get the OS software up to date, set the hostname and secure the server:
- https://www.linode.com/docs/getting-started/
- https://www.linode.com/docs/security/securing-your-server/ (ignore the firewall step, there is a simpler method detailed below)
I prefer to use UFW (Uncomplicated Firewall) rather than work with IPTables directly. UFW should already be installed and set up for IPv6 so we can get straight to the configuration. Log in to the server as the user you set up earlier and run the following:
sudo ufw disable
sudo ufw default deny incoming
sudo ufw allow ssh/tcp
sudo ufw allow 2368/tcp
sudo ufw enable
Here we have set it up to deny all incoming traffic unless it is coming into the SSH port or our soon-to-be-running Ghost port (we will change this later once the web proxy is configured). Further info about setting up UFW can be found in this handy DigitalOcean guide.
Finally, lets install some pre-requisites ready for the Node/Ghost installation:
sudo apt-get install build-essential git curl wget
Node installation
Rather than install from source, I have opted to install Node.js via the PPA maintained by NodeSource. This provides a more up-to-date node version than Ubuntu whilst keeping the convenience of package management. Run the following whilst logged in on the server as the user that you set up earlier:
curl -sL https://deb.nodesource.com/setup | sudo bash -
sudo apt-get install nodejs
Now check that Node.js and NPM were installed correctly, in my case the versions were v0.10.35 and 1.4.28 respectively:
node -v
npm -v
Ghost installation
The fun stuff!
Get GitHub and your server to play nice
But first, the not so fun stuff. We want to be able to clone our git repository directly on the server so it's necessary to generate an ssh-key on the server then add it as a deploy key in GitHub so GitHub. This gives GitHub the necessary information to recognize and trust your server.
Because sudo privileges will be needed to clone the repository into /var/www we need to ensure that the ssh key is generated for "root" rather than our non-privileged user. SSH in to the server as the user that was set up earlier, then run the following (replacing your e-mail):
su -
ssh-keygen -t rsa -C "my-email@example.com"
When it asks for a password, supply the 'root' user's password
Follow the instructions then use nano or similar to read the file ~/.ssh/id_rsa.pub and copy the contents. Make sure to run exit when you're finish to drop back to our normal user environment.
Next, add the deploy key to your GitHub repo by following the "Deploy Keys" steps here (ignoring the ssh-keygen process as we already have the key stored in the clipboard) https://developer.github.com/guides/managing-deploy-keys/#deploy-keys.
Download and install Ghost
The actual fun stuff! Lets clone and install our blog code. Logged into the server as your normal user, run the following:
sudo mkdir /var/www
cd /var/www
sudo git clone git@github.com:my-account/my-blog.git
cd my-blog
sudo npm install --production
This clones our code to /var/www and then installs all of Ghost's node dependencies
Configure Ghost
To make sure that everything is working ok we're going to run the Ghost server and connect to it directly on port 2386. There's just one setting that needs to be changed first:
sudo nano config.example.js
In the "Production" section, change the following:
host: '127.0.0.1',
to:
host: '0.0.0.0',
Use Ctrl-X, then 'Y' to exit and save.
Changing the host to '0.0.0.0' means that the server will listen to all incoming connections. If we kept the setting at '127.0.0.1' then the Ghost server will only listen to connections coming from the same machine, not so useful when we want to connect to it from the outside world!
Create 'ghost' user and start the server
Lets create a new limited-privileges user called 'ghost' to run the Ghost application server (be sure to replace 'my-blog' with the actual folder name):
sudo adduser --shell /bin/bash --gecos 'Ghost application' ghost
sudo chown -R ghost:ghost /var/www/my-blog/
To start Ghost it's necessary to log in as the 'ghost' user before starting the server:
su - ghost
cd /var/www/my-blog/
npm start --production
All things being well, you should now be able to browse to the site and see it running live. In my case I set up the subdomain ghost.lookingsideways.co.uk as the hostname during the server setup steps earlier so I can visit http://ghost.lookingsideways.co.uk:2368.
Notice the port 2368 tacked on to the end of the URI? Yep, that's ugly and not particularly user-friendly but it's fine whilst testing and getting set up. You'll also notice that the terminal needs to be left open and logged in as the ghost user to keep the blog alive, what a pain! The next steps detail how to remove those limitations and move to a more production-level setup.
Proxying with Nginx
The blog's up and running but that 2386 port requirement is annoying. To workaround that we're going to install and configure Nginx (a super fast, lightweight web server) to handle requests on port 80 and proxy them to the Ghost server.
NB. You'll want to keep the ghost server running in one Terminal tab and connect to the server again as your normal user in a new tab for now.
sudo apt-get install nginx -y
That's installed the server, now it's time to configure it. Run sudo nano /etc/nginx/sites-available/my-blog.co.uk and enter the following (replacing the server_name entries with your own details):
server {
  listen 80;
  server_name my-blog.co.uk www.my-blog.co.uk;
  location / {
    proxy_set_header   X-Real-IP $remote_addr;
    proxy_set_header   Host      $http_host;
    proxy_pass         http://127.0.0.1:2368;
  }
}
Again, Ctrl-X and 'Y' to save and exit. Next enable the new site restart Nginx for the changes to take effect:
sudo ln -s /etc/nginx/sites-available/my-blog.co.uk /etc/nginx/sites-enabled/
sudo service nginx restart
Next it's necessary to allow port 80 through the firewall:
sudo ufw allow www/tcp
Woohoo, now your blog is available at http://my-blog.co.uk with no port!
If it's successful, don't forget to remove external access to port 2368. First run:
sudo ufw status numbered
That will give you a numbered list of firewall rules. Take note of the numbers that correspond to 2368/tcp and 2368/tcp (v6) then delete them:
sudo ufw delete 2
sudo ufw delete 5
Running forever
Right, the blog is up and it's accessible with no port but keeping a Terminal session open and running npm start --production all the time just won't do! Time to fix that and make sure your blog survives a server restart.
First, let's stop the currently running server that (we left it running in a different tab in the previous step) with a quick Ctrl-C. That should drop us into an su environment as the ghost user, confirm this by checking the command prompt reads ghost@... then run the following (again making sure to replace the my-blog folder name):
cd /var/www/my-blog
sudo npm install -g pm2
echo "export NODE_ENV=production" >> ~/.profile
source ~/.profile
pm2 kill
pm2 start index.js --name ghost
That sets pm2 up to manage the Ghost server but there is one final step needed. We want the ghost server to start up automatically when the VPS boots up and to do that we need to install an init script.
Our 'ghost' user doesn't have sudo privileges so lets exit out of the su - ghost environment and use pm2 to install the scripts:
exit (check command prompt now reads 'your-user@ghost')
sudo env PATH=$PATH:/usr/bin pm2 startup ubuntu -u ghost
That's it! Everything should now be set up and fully functioning. Run sudo reboot to restart the VPS and verify that the blog starts back up.
PM2 has a ton of extra features for managing processes and their docs are great (https://github.com/Unitech/pm2), just remember that to manage the ghost processes you will need to either ssh in as ghost (copy your id_rsa.pub key to /home/ghost/.ssh/authorized_keys) or use su - ghost after logging in as your main non-root user.
Custom domain and security cleanup
There's just one final piece left to this puzzle and that's setting the blog's domain and doubling up on the security by switching the ghost server back to 127.0.0.1 so it's not directly accessible from the outside world. Edit the config file by running:
sudo nano /etc/www/lookingsideways/config.js
In the "production" section, change the url to match your domain:
url: 'http://my-blog.co.uk',
And the host to:
host: '127.0.0.1',
Changing the host isn't strictly necessary as access to port 2368 is now blocked by the firewall but I prefer to change it in both places so that a misconfigured firewall doesn't mean that the Ghost server becomes directly available on the internet.
Finally, in order for the changes to take effect we need to restart the ghost process. As the 'ghost' user, run the following:
pm2 restart ghost
Making Changes
The procedure for updating your blog isn't as simple as some other setups but it's designed to ensure that updates are tested and you always have a way to revert to a previous version, or even rollback individual changes.
- Make changes in your local code
- Test using local server
- Commit to git and push to GitHub
- Update code on the server
- Verify changes are working on live site
Adding Google Analytics
1. Making the changes
First of all, if you haven't already, sign up for a google analytics account and set up a "Property" for your blog. You'll want to copy your tracking code into the clipboard.
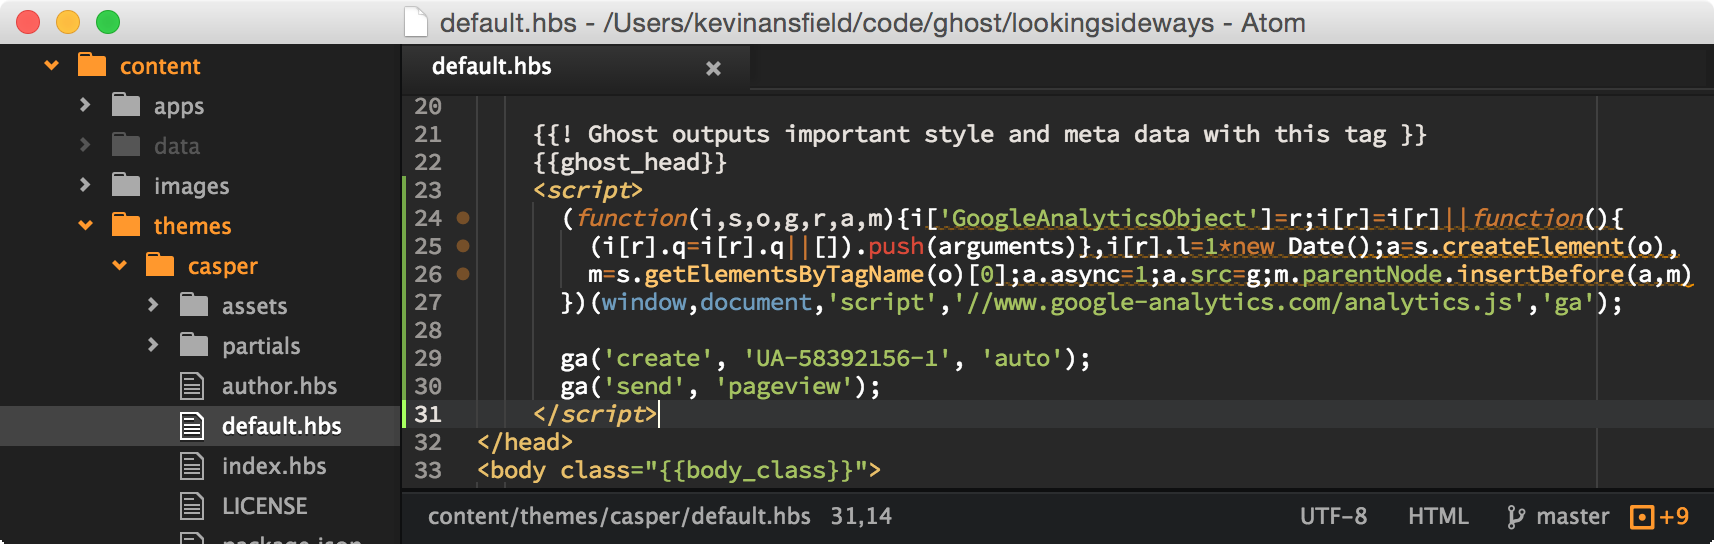
In your local repository, find content/themes/casper/default.hbs and open it in your editor. Immediately under the {{ghost_head}} line, add your tracking code like so:
2. Test locally
Open up Terminal, cd to your blog folder, then start up your local Ghost server:
cd ~/code/ghost/my-blog
npm start
Now you can visit your blog at http://localhost:2368. Test that your changes have worked by opening up the Web Inspector and verifying that your tracking code is present:
![](/content/images/2015/01/Screen-Shot-2015-01-09-at-11-00-13.png
Awesome, everything appears to be working well!
3. Commit changes, push to Github
This is where using a git repository comes into play. We can record this single change as a point in history so that we can revert to a previous point in time or even just undo this individual change at a later date if we decide it's no longer needed.
git add content/themes/casper/default.hbs
git commit -m "Add Google Analytics tracking code"
That records our change history locally but for the next step we want to pull this change into our live site, so lets make it internet-accessible by pushing to GitHub:
git push origin master
4. Get it live
Now we come to the most important part, transferring our local changes to our live site. First we need to log in to our server and pull our changes from GitHub:
NB. You will need to add the 'ghost' user's ssh public key as a deploy key in GitHub. The Get GitHub and your server to play nice section details the process, just make sure you log in as 'ghost' and skip the su command, or use su - ghost to switch to the ghost user
ssh ghost@my-blog.co.uk
cd /var/www/my-blog
git pull
That's our code updated, simple wasn't it! But wait... If you check your blog now you'll notice that your changes aren't showing!
There's one last step and that's to restart the Ghost application server so that it picks up our new code. Run this and you should be golden:
pm2 restart ghost
5. Test it live
It's easy to assume all is well at this point but we can never be too careful! Browse to your live site and perform the same check we did above for the local site, hopefully all is well and Google Analytics is now tracking all of your blog visitors.
Next Steps
If you would like to host multiple blogs, check out my follow-up post Running multiple Ghost blogs on a single VPS.